Monday, May 9, 2011

Last Drift in Bowness [oil, 12x9]

I made it out into the fresh air today to paint.  I chose Bowness Park as it’s close to home in case I forgot anything and dog friendly.  Farley enjoyed about 10 minutes of the 2.5 hour session and then he was cold.  Lesson learned.  He stays home.

Spring Threatens WinterThis was a fight to the finish.  I spotted this last little bit of snow hiding behind some trees.  The was a nice, sunny path above and a bare stick forest behind.  This is on a north exposure so nothing has budded up there yet.  Sad really.  But the light promises so much warmth to come.  I think I learned a few things on this one…  at least I hope so.  I used far less white and found that helped to not kill the colors.  It was fun.  Might be a scrape tomorrow though.  Cheers!

Retweet this

Friday, May 6, 2011

Blowing in Over Bearspaw [oil, 9”x12”]

Blowing in Over Bearspaw

This is the view northwest toward Bearspaw reservoir from my deck. Weather rumbles up the Bow River valley so it’s a great spot to watch active weather year round.  The weather was beautiful this morning but I had appointments.  I scanned for a decent plein air view as I returned from my errands.  When I saw the clouds rolling in I hustled home and set up to paint.  By then the sky looked completely different, of course!  I used a baltic birch panel sealed with amber shellac [but that process is another story!]…  it feels completely different than the canvas I’ve been using.  I found I needed to add more walnut oil to make the paint adhere.  Interesting…  just one more tiny step up the learning curve… Cheers!

Retweet this

Thursday, May 5, 2011

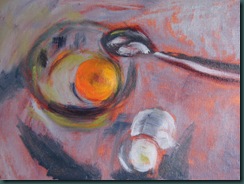
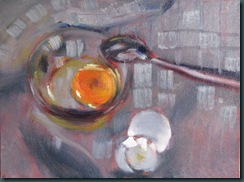
The Escape [oil, 9”x12”]

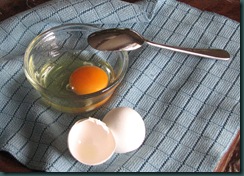
the escapeMy plein air plans have been put off for a few days while I rest up after a little spring cold.  So, rather than sitting out another day on the sidelines, I set up a little still life and played with my plein air gear inside. 

I took a few photos through the process.  Those of you that are more experienced with oils are welcome to chime in with pointers as you see the things I’m struggling with. 

This first sketch and layer…  I struggled, as usual, with the composition at the drawing stage.  It’s my weak point..  I miss painting on paper some days – canvas panels like this take the “cropping” options away.  I struggled with the closest egg shell, getting it wrong from the get go. 

IMG_0398IMG_0397

After establishing the shadow areas in the darker blue/grey, I move on to dropping in some mids [and leap to highlights – too soon!].  My eggs are quite scrambled at this point. 

IMG_0399

Below, I’m still working on both the darks and the lights…  just oilier.  I’ve caught on to the drawing mistake re the spoon handle and fixed that so I’m starting to feel the form of the spoon.IMG_0407 I wrap it with a bit more finesse on the bowl of the spoon.  the escape Cheers!

Retweet this

Wednesday, May 4, 2011

Ode to Sharon

sharon photo The mixed media class I attended all year wound up this past Monday.  Sharon Williams instructed this all year class for the past 3 years and her water media all year classes for many more.  In future she will be offering classes of shorter duration and workshop format. 

I’ve been part of Sharon’s classes since September 2005.  I’m sorry to have missed Monday’s class [conflict with my oil painting class] but this poem written by my classmate and friend, Sally Hodges, sums up Sharon’s impact on her students.

Poem for Sharon Lynn Williams

An artist sat on a folding chair,

She held her paintbrush in the air.

“What would happen if?” she said,

And thought of the message on her fore-head.

“Repetition with Var-i-ety”

“This way I’ll find out what might be”

She said, never needing herself to coax

As she set to work with new, bold strokes.

“I’m gonna keep loose and take a risk”

Never had art seen one so brisk –

This lady was fast! This lady had powers!

And she painted on for hours and hours.

Now this artist took on lots of folks

Teaching them what was real and what a hoax.

She passed on her knowledge. She shared her skill

And taught that art needs people’s… will.

Her passion was contagious , her eye very sharp,

On the less than good she did not harp!

“Isn’t this exciting!” she’d often exclaim,

“We’re going to play the Waldo Game”.

So she mixed up quins and her favourite blue,

“Looking for the colours is what you do”.

“Now if you are stuck you simply say

‘What do I like, or not, today?

What do I need to leave or change?

Believe that you know how to gauge.

You can fix and change and choose

No rules of never, so there’s nothing to lose”

So her students worked ‘til they all could say

“How cool is that!”…like their teacher one day.

 
Great poem Sally!!!  I’d like to add my 2 bits worth in prose.. 

Sharon, You taught me a lot of things about art, among the most important was to accept constructive criticism.  That sounds like something that should have been in me already but, alas, I missed that part of my childhood education.  Assigning homework, and critiquing the results allows you to gauge where each student is.  Their response to critique gives you more information about how to help them [or not].  THAT is why I've learned so much under your tutelage.  I've taken several other classes and no other teacher has bothered to take those risks consistently, thus I haven't learned how they think and, consequently, how I should approach critiquing my own work.  THANK YOU SO MUCH! 

I count myself fortunate to have such a mentor and friend,

Cheryl

Retweet this

Tuesday, May 3, 2011

Peonies in Blue Vase [oil, 11”x14”]

peonies2 Monday’s art class was the last of our still life exercises.  It’s interesting to try out new painting methods, especially when I don’t really even have the feel of the oils yet.  In short, the method used was:

  1. sketch big shapes in composition with very dry neutral
  2. loosely scratch in the darkest shadow shapes using either a)the same dark neutral above OR b) the darkest local color.  Method b) would help if further layers were getting too muddy for us.
  3. move up to the mid value shapes and continue to loosely scratch those in.  “Scratch” isn’t a technical word…  it just helps me to remember what it’s supposed to sound like when the brush is applied to the canvas…  dry and scratchy at this point.  That means the paint is dry enough and you’re applying it thinly enough.  Also, you’re painting PLANES not PETALS in this step – think geometry…  circle, triangles, square, rectangle, trapezoid… [etc yawn].  Thinking flowers, petals, and vases will be counterproductive at this point.
  4. getting lighter, tighter and oilier, stroke a few petal type shapes “as if you’re petting a bug”.  The higher oil content allows the paint to exit the brush without disturbing the wet layers beneath.  Make only enough marks to say flower or vase or whatever..  don’t overstate.
  5. now it’s time for some background…  I painted the drapery and the wall [including shadows] loosely and quickly.
  6. Assess…  are more highlights needed?  With the background done one can see the overall effect and make this decision.  I added several highlights at this point. 

I’m loving this medium!

Retweet this

Monday, May 2, 2011

More Encaustic

IMG_0370 The lifelines in this first painting were created with loops of yarn soaked in encaustic paint and collaged on to the board.  I built the hills out of some extra chunks of colorful wax laying around on the table.  The silver lifesaver is glass, from Michael’s and a discard from my jewelry pile.  IMG_0379

This one came about as a result of the pattern in the initial application of clear wax. The lines suggested tree trunks to me and I proceeded with that in mind.  Hmmm…  no plan is not the best way for me to work!

IMG_0378This one began with the collage piece I made printing a public domain image onto fabric using Golden’s digital ground.  After I collaged the image on I added embroidery thread as a type of frame around it.  As I did this the redhead began to disappear under all that opaque wax.  I heated the area and picked up the excess wax with my brush – easy!  I love that part of this board. I used a lot of fabric in the figure’s face and collar.  On the lower left I painted encaustic through a thick lace piece which made a deep ridge pattern when pulled out of the cooling wax.  It left behind some orange paint which worked pretty well with the red of her hair. 

This was a great experience for me.  I now understand some of the strengths and weaknesses of encaustic as a medium.  I’m not excited enough to go out and purchase the gear to paint encaustic though…  I’m back to my oil painting class today and that’s really where my heart is right now.  Cheers!

Retweet this

Sunday, May 1, 2011

Encaustic Fun

I attended a fun encaustic workshop hosted by the Calgary FCA and instructed by Ken Bourassa on Saturday.  Ken began with an overview of the basics of encaustic art – painting and/or sculpture. I found a website – All Things Encaustic -with much of that basic information.  Ken is more of a purist than this site.  He mixes the beeswax with powdered pigment rather than using oil paint as described on All Things Encaustic. 

It was fun to see some of the things that can be done with wax and pigment.  We used pucks of paint that Ken made up for the class, melted them in foil tins on large flat griddles, and used cheap bristle brushes to paint on 1/4” hardboard.  It sets up very quickly when it hits the board!  Working quickly is your only option.  We shared an iron and two heat guns to “fuse” the wax into the board and the various layers to each other.  When we got a chance, we also used the heat guns to melt wax on the board so that we could move the paint around.  I found the layers built up quickly and the wax is fairly opaque.  At one point I heated an area and pushed several layers off of a collage element…  it’s very flexible.

Here are two of the pieces I started yesterday…  finishing them could be problematic since I have none of the equipment.

This one is a simple landscape with no collage elements and very little reheating.  Lots of brush stroke remain in the paint – I love that!  This was the last painting I did…  it took about 10 minutes and I feel that, at least in the sky, I was just beginning to get a handle on mixing the colors to get decent neutrals and the grey in the sky is the result…

IMG_0375

I used several methods in this painting.  First of all I collaged some a paper napkin onto the board with clear wax…  then I picked up a flat lump of encaustic paint left by previous workshoppers – about 8” long, 2” wide and 1/4” thick and glued it onto the board with clear wax.  Then I used a heat gun for quite a while, remelting the wax in that thick lump and moving the board around to get the wax to flow.  Another chunk of wax looked very much like a white figure with a smaller figure beside it.  I used scissors to cut out a white head from the waste wax and melted it on to the figure.  The smaller figure is painted as is some of the bottom and the top left.  Fun stuff.

IMG_0372

Retweet this